> For the complete documentation index, see [llms.txt](https://infinitypbr.gitbook.io/magic-pig-games/llms.txt). Markdown versions of documentation pages are available by appending `.md` to page URLs; this page is available as [Markdown](https://infinitypbr.gitbook.io/magic-pig-games/other/runtime-color-sampler/runtime-color-sampler-prefab-and-class.md).
# Runtime Color Sampler (Prefab & Class)
v1.1
The **Runtime Color Sampler** prefab located at `Assets/Magic Pig Games/Runtime Color Sampler/Prefabs`
This is most usually brought into your scene as a child of the "Player" object, though you can put it anywhere you'd like to have the color sampled.
This object has the `RuntimeColor` component on it, and two children: [**Sample Sphere**](/magic-pig-games/other/runtime-color-sampler/runtime-color-sampler-prefab-and-class/sampler-sphere.md) and the [**Sampler Camera**](/magic-pig-games/other/runtime-color-sampler/runtime-color-sampler-prefab-and-class/sampler-camera.md). The sphere is very small with a default white material. The camera captures the lighting conditions at the position of the sphere.
## Required Fields
*v1.1: Average Color Shader is removed and not required!*
The Sample Camera, which should also be populated for you, is a child of the Runtime Color Sampler object.
The Prefabs folder contains the **Light Sampler Render Texture**, which is the `RenderTexture` the Sampler Camera writes to.
## Runtime Color Settings
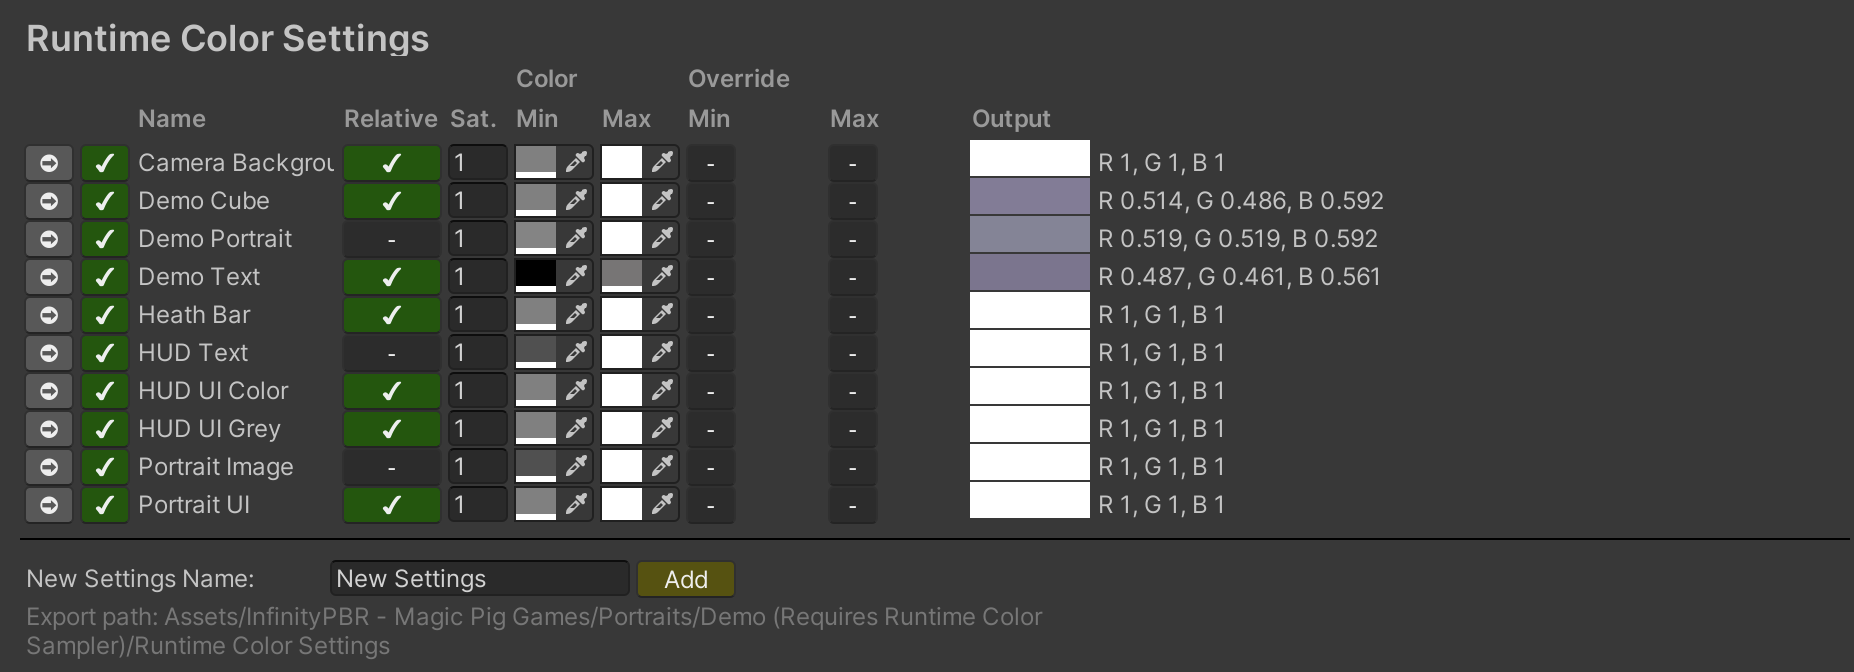
If you alread have [**Runtime Color Settings**](/magic-pig-games/other/runtime-color-sampler/runtime-color-settings.md) objects, you will see them populated in the Inspector. If you've installed the Demo folder, then you will see the Runtime Color Settings objects for the demo here.
These are Scriptable Objects. Each one has settings to process the average color into a final color which can be passed to objects in your scene through a [**Runtime Listener**](/magic-pig-games/other/runtime-color-sampler/runtime-listener.md) component, attached to those objects.
You can create a new Runtime Color Settings object here as well -- type in a new unique name and click the "Add" button. The new object will be saved in the same location as the first object in the list, or in a new location if no settings objects exist yet.
### Settings Options
1️⃣ The "Arrow in a Circle" icon will ping the Scriptable Object in your scene. You can edit these settings on that object itself, but it may be easier to use the Inspector for the Runtime Color Sampler.
2️⃣ The checkmark will enable and disable the entire Settings object. When disabled, it will not process, and any object listening to it will not update.
3️⃣ The "Relative" option determines how the RGB values are clamped when they're outside of the min/max range. When true, one of the three values (R, G, or B) will be set to the minimum or maximum value for this Settings object. The other two values will be brought up or down proportionally.
This helps keep saturation and hue, but it can also lead to saturated colors that are darker or lighter than you may wish.
When false, all three values (R, G, and B) will be brought to the minimum or maximum value, resulting in a grey image. In some cases, this outcome is desirable. In others, it may not be. Test out your settings in your project, and choose what works best for you.
4️⃣ "Saturation", or "Sat." in the Inspector, is a value from 0-1, with 1 being fully saturated, and 0 being fully desaturated. This can remove all or some of the color from the average color sample.
5️⃣ The Min/Max colors are the clamp range for each Settings object. Note that the minimum or maximum value of each will be used, not the color itself. Therefor it's best to keep them as grey values, with R, G, and B all being equal.
6️⃣ The Override Min/Max values allow you to override the normal Min and Max values at runtime. This will affect all objects listening to the Runtime Color Settings being overridden. Generally this would be used at runtime, but you can enable these and set their values, and they can be active by default in your project, if you so choose.
7️⃣ The output color box is active at runtime and will display the output color of that Settings object. During runtime the input average color sampled from the Sample Sphere is also displayed, along with the R G B `float` values. This is here for convenience and debugging.
## Greyscale Settings
When the **Saturation** value is not set to 1, the final value will be desaturated. The human eye handles colors in different ways, so these values are utilized in the desaturation algorithm. You can modify them to get the result you'd like for your project.